How to assemble a siphon for a bathtub and sink
Not a single bathroom can do without a siphon. This device allows you to drain used water, and also blocks unpleasant odors from the sewer. To collect a siphon for a sink in the bathroom with your own hands, you only need a screwdriver and a little dexterity.

Types of siphons
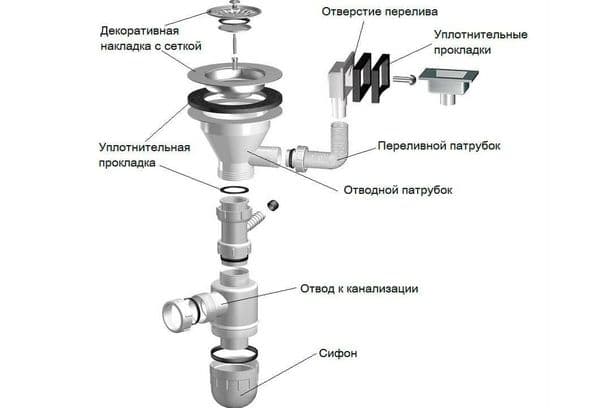
The siphon is a curved tube that connects the sink to the sewer system. Thanks to the water seal, unpleasant odors do not enter the room. The siphon partially protects the pipes from clogging.
The main details of the siphon are: the tube itself, the protective grill, a set of rubber gaskets, coupling nuts, screws and conical cuffs.
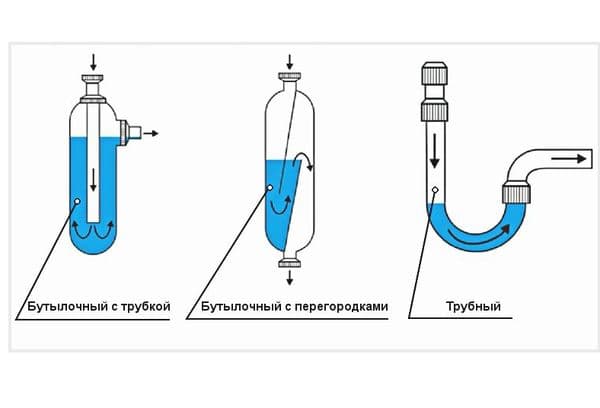
There are several types of plumbing siphons. Three groups are distinguished by device:
- Tubular: base - curved pipe, straight or corrugated.
- Bottle - compact and comfortable, the water lock is provided by the expanded lower part of the pipe in the form of a bottle.
- Ladder - the smallest siphon, suitable for small bathrooms. It works on the principle of a dry valve, not a water seal.
Choose the most convenient siphon for the bathroom. Overflow constructions are needed to protect the apartment from floods: when the water level reaches a critical limit, the overflow hole and an additional pipe will do their job.
The drain plug is also important. The initial siphon models included a rubber gag on the chain; today you can find semi-automatic and automatic drain designs. They are activated by pressing a button or turning a screw.
The most popular material for the system is plastic, cast-iron models have faded into the background because of the difficulty in choosing plumbing. The most aesthetic, but expensive siphons are made of copper-based alloys.
It is easy to get confused in the choice of modern plumbing elements. The best options in terms of price and quality ratio are Ani Plast manufacturers (domestic plastic siphons, models e155 and e255 cost around 500 rubles), it is worth highlighting from elite models Viega (solid German company) and Geberit (expensive but reference plumbing).
Advice from purityis.decorexpro.com/en/
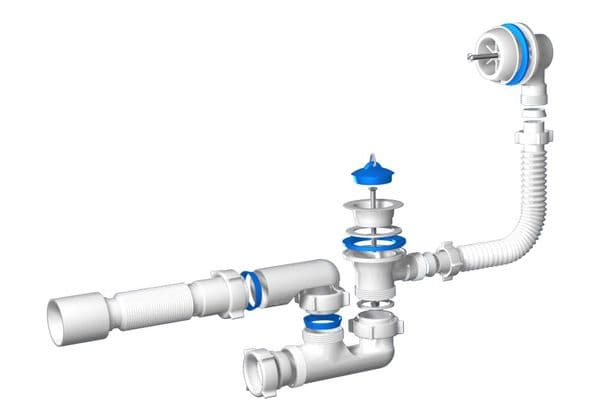
When buying a siphon, consider where you will connect the washing or dishwasher. It is much more convenient to do this with an additional entrance to the siphon, and not directly to the sewer. Also, double structures are conveniently mounted in rooms where the bathtub and sink are nearby.
Assembling the design
It all starts with the purchase of a suitable model. It is better to consult with the specialists of the store in which you purchase plumbing. An important rule: the pipe that connects the drain and the sewer should be as short and straight as possible. The site that is attached to the drain is located above the place of attachment to the pipes of the sewer system.
A conscientious manufacturer always attaches to the product assembly instructions with a list and image of all components. Be sure to study this application, as the plumbing part may have features.
Tip
Schematic instructions do not always answer questions from beginners. If you are collecting a siphon for the first time, then consider all the recommendations below.
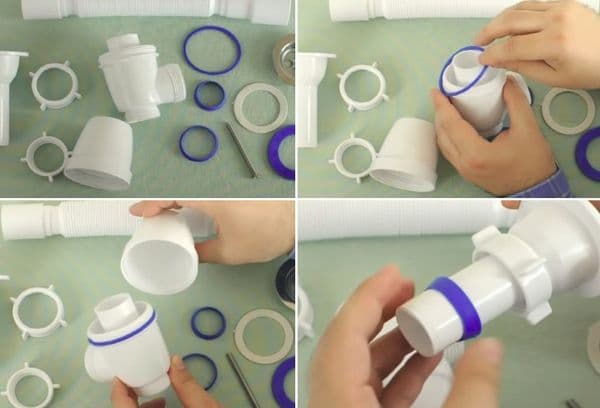
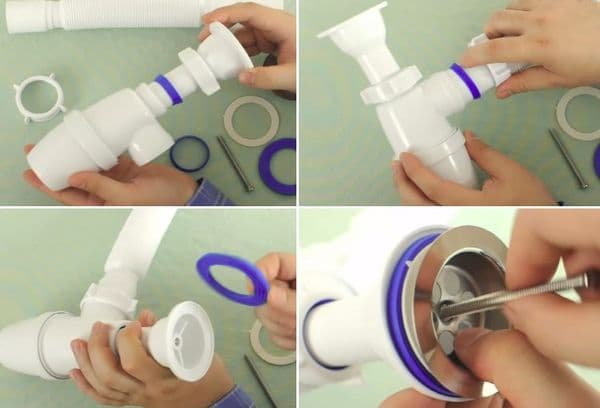
How to assemble a siphon, the instruction step by step on the example of a bottle design:
- Check all components for missing or extra parts. This will allow you not to get confused during the assembly process.
- If there is an old siphon, dismantle it and clean the drain and overflow units from scale and dirt.
- Fix the rubber seal to the connection block. Screw the bottom cover all the way down - you should get a bottle structure.
- Put a nut on the nozzle, fix the cone-shaped gasket with the wide side. Insert it into the upper siphon connector, fix the rubber with a nut.
- Screw the upper part to the nozzle in the same way.
- Next, screw the extension cord or corrugated tube, as well as the overflow pipe. Do not forget about rubber inserts.
- Connect the drain and overflow assemblies with rubber gaskets, grids and nuts.
- Done! Check the siphon in action. No leaks should be. Use a sheet of paper for the test. If the siphon leaks, then the matter is most likely in the oil seals - they are worn out or did not sit tight enough.
Siphon care includes periodic cleaning of the drain grate, as well as the use of chemicals against blockages. Advanced users choose models with a hair collector - a special internal grille that blocks the ingress of such debris into sewer pipes.
Unscrew the nut periodically to collect accumulated debris. It is for this reason that the parts are not sealed with sealant. You should always have access to internal parts in case of congestion. Tightness should provide rubber gaskets.
As you can see, special knowledge for the successful collection of a siphon in the bathroom is not required. Anyone will cope with this task, calmly disassembling the instructions and accessories. Choose only high-quality siphons so that there are no problems with installation and tightness of the structure.