How to hang horizontal or vertical blinds on plastic windows: options with and without drilling
Content:
To hang blinds on plastic windows, it is not necessary to invite professional installers. Modern models can be attached to a plastic window on special brackets. There are also varieties that hang without drilling. Each method has certain advantages (as well as weaknesses). We will figure out which option is better and how to bring it to life on our own.
How to measure?
To install the brackets and attach the blinds to them without any fuss, it is important to know the correct dimensions. They depend on how it is planned to fix the entire structure to the windows.
There are several places where you can attach the blinds:
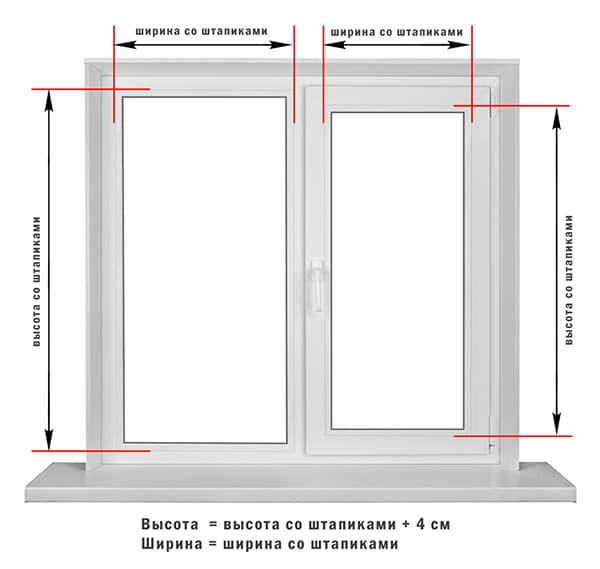
- In the window opening. In this case, we subtract 4 cm from the distance between the slopes, and from 1 to 3 cm from the distance between the lintel and the window sill. Then the lamellas will not strike on the window sill when opening, and the whole structure will look harmonious in the opening.
The window opening may have a trapezoidal shape. Then it will be already at the glass and wider at the edge of the window sill. To prevent the blinds from being too narrow or too wide, mark the place where measurements were taken.
- On the sash. In this case, a separate structure is fixed on each leaf so as not to interfere with opening and closing the window. To get the dimensions, measure the height and width of the glass. Then add an additional 3 cm to the width, and 5 cm to the width. Then the lamellas will completely cover the light opening.
- Wall or ceiling mount. In this case, measure the distance between the brackets at the selected level. The width should be at least 10 cm greater than the width of the opening (more is allowed). The height of the blinds is determined based on personal preferences. There are two options: the lamellas can hide the window sill, or not reach it by 1-2 cm.
Do not forget to immediately record all measurement results.
Although horizontal and vertical designs are very different in appearance, the measurement technology is the same.
Preparatory work
Preparation begins with a careful examination of the purchased blinds:
- With instructions in hand, check if all parts are in stock.
- Make sure the cords are not tangled.
If you forgot to put one of the parts in the package, it will not work to assemble the blinds. It is better to immediately contact the supplier and replace the defective kit than to spend time trying to pick something up instead of the missing or defective part.
Also, to install the blinds, you need to prepare a window and a room:
- Remove flowers and other things from the window - provide access.
- If during installation you have to drill holes for installing the brackets, it is worth covering the window sill and several meters of the floor next to the window with newspapers or plastic wrap.
The final part of the preparation concerns the tools:
- Make sure that everything you need is at hand, the cord length of the drill is enough to solve the tasks, and there is a reliable support for the legs.
- Do not work while standing on stools or unstable furniture. Better prepare a stepladder or goats.

Necessary materials and tools
The set of tools will depend on the mounting method chosen. To attach lightweight blinds without drilling to plastic windows, scissors and a skein of double-sided tape are enough.But if you plan to drill the walls to install the brackets, you will need more tools:
- drill and drill for it (usually take No. 6);
- dowel and hammer;
- Phillips screwdriver.
For each method, you will also need a tool for disassembling the blinds themselves (screwdrivers), as well as a pencil, tape measure and a building level for marking.
Step-by-step instructions for attaching horizontal blinds
Lightweight constructions are mounted directly on the frame using small self-tapping screws screwed into a plastic profile. The disadvantage of this method is the remaining holes after installation. If in the future you need to remove the blinds, traces of screws will spoil the view.
It is impossible to drill holes for self-tapping screws close to the glazing bead: glass can crack from vibration. Therefore, it is very important to correctly place the space for each bracket and not make a mistake with the choice of blinds.
The algorithm of work looks like this:
- Fix brackets to the louvre housing.
- Attach the casing so that on both sides the lamellas extend the same distance behind the glass. In this case, you need to make sure that the canvas does not interfere with turning the handle, opening the window sash or putting the window on ventilation.
- Align the louvre housing horizontally using the bubble level. If this is not done, the mechanism may skew.
- Mark with a pencil the places where the brackets will be attached to the frame. Then remove the brackets from the housing, individually attach them to the frame and mark the position of each hole.
- Drill holes for self-tapping screws with a drill No. 2 or No. 2.5 (the plastic from which the frames are made can crack if you try to screw the screws without pre-drilled holes).
- Screw the brackets into place, insert the louvre housing into them until they click. We drill holes for the lower latches and fasten them to the lower side of the frame.
The last step is to replace the end caps and make sure that the blinds mechanism is working properly, and the lamellas do not interfere with opening the sash.
If the frame still has "extra" holes, they will be hidden by a white silicone sealant. After it dries, the frame will perform its functions well. Acrylic sealant is not suitable: it quickly turns yellow and loses its appearance.
Step-by-step instructions for attaching vertical blinds
Work begins with markup. The operation procedure is the same as in the previous version: we attach the brackets to the case, apply the case to the wall or ceiling, we outline a place for each hole. But there are specific features:
- Since blinds with vertical slats are a heavier structure, it is worth hanging them on a full set of fasteners. If the cornice is longer than 2 m, an additional bracket in the middle will be required to the two side supports.
- To drill holes in concrete, you will need a thicker drill (No. 6) with victorious soldering on the tip.
- The dowels included in the kit may not be long enough for a secure fit. Therefore, it is worth replacing them if necessary.
Having marked the holes, drill them with a drill and insert them into each plastic plug. Then we fasten the brackets, snap the case into them. The final step is to install the side plugs and check the operation of the mechanism. After that, weights are inserted into the lamellas and connected by chains.

Fasteners without drilling
There are several reasons for choosing fasteners without drilling:
- unwillingness to mess with a drill;
- lack of power tools in the household;
- the impossibility of drilling windows or walls for any reason (for example, a ban spelled out in a rental contract).
First of all, read the instructions for the purchased blinds and make sure that they can be fixed to double-sided tape. Usually, such a mount is suitable only for the lightest models, because its reliability leaves much to be desired.
If you are sure you can do without drilling, proceed as follows:
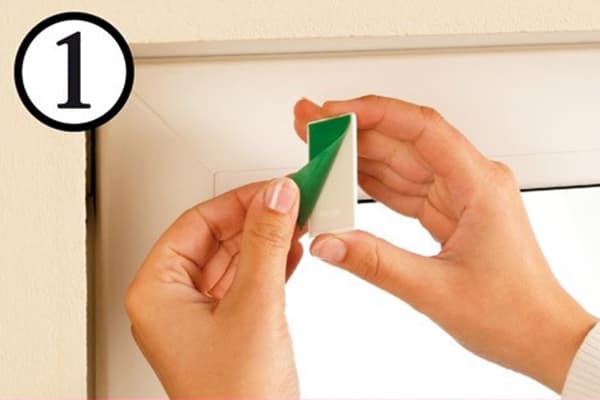
- Stick a strip of double-sided tape on the back side of the blinds body (before that, the strips must be removed from the body for adjustment).
- Last time try on the block against the wall, if necessary, mark its location with a pencil.
- Peel off the protective film on the second side of the adhesive tape and firmly press the unit into place. Reliable bonding will occur in 1-2 minutes.
- All that remains is to replace the adjustment strips and slats.
In the future, care should be taken when cleaning and using the blinds so as not to tear them off with too much jerking.
Try to cut a piece of double-sided tape as accurately as possible in size of the back of the case. If the adhesive tape sticks around, it will ruin the view. A too small piece of tape will not provide reliable bonding.

Useful Tips
When choosing blinds, pay attention to the material. For example, blinds with aluminum slats are perfect for the kitchen: they do not light up even when exposed to open fire. Plastic is best suited for the bathroom, since it is not affected by moisture. And for living rooms, cloth or wood are ideal.
If you plan to install blinds on several windows, each aperture and each sash need to be measured separately. Although they look the same on the eye, the difference in length or width may be sufficient so that the canvas begins to interfere.
It is better to double-check each measurement at several points. For example, to measure the width, at least three measurements are made: under the ceiling, near the windowsill and in the middle. For height, two measurements are sufficient (left and right), but the third will not hurt. It is almost impossible to shorten or increase the manufactured lamellas. The more accurately the dimensions indicated in the order are, the easier it will be to hang the canvas on the window and then use it.

Alternative mounting options
Cassette blinds consist of a box with a mechanism and side guides. They are mounted on frames. The box is mounted on top of the frame with screws, and the side runners are glued on the sides to double-sided tape. It remains to unfold the canvas, carry out the adjustment and fix the accessories.
For roller blinds, the installation principle is the same as for horizontal blinds. You can hang them on the sash or in the window opening.
We hope that our advice allowed you to present all the stages of ordering and installing blinds on a plastic window. If you do all the operations carefully, to cope with the installation yourself is not at all difficult!